Everything you need about Snapchat Filters / Lenses
Everything you need about Instagram Filters
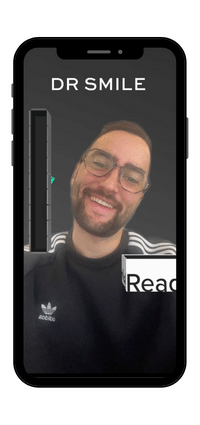
What is a Snapchat Lens? Definition?
Snapchat Lens is content in Augmented Reality that you can add when you use the Snapchat Application. Snapchat was the first Social Media platform that offer the possibility to add Lens to Social Media Content. It’s one of the key features of Snapchat’s Application because users can make the environment more beautiful with World AR or add 2D or 3D assets on their body, face, foot, hair, etc. With Tracking technology.
Difference Between a Snapchat Filter and a Snapchat Lens? Definition?
Snapchat Filters are content that increases the reality after taking a photo or video on the Snapchat mobile application. It’s not Augmented Reality, because it will only add colorimetry variation or 2D frame on the screen. Snapchat Lenses are Augmented Reality Experiences that add an element in 2D / 3D on the user or the environment before taking a picture or video. It can integrate interactions or animations to make the filter more dynamic.
Find/Search Snapchat Lenses? Where?
6 ways to find lenses on the Snapchat Application.
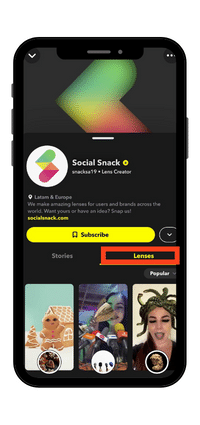
On Snap Account owner
When brands or creators publish a lens, you can find a tab on their account with all lenses they created. This tab is called “Lenses” and you will find a thumbnail of the effect with a preview image and the name of the lens. To try it, you must click on the image, and then your camera will be activated.
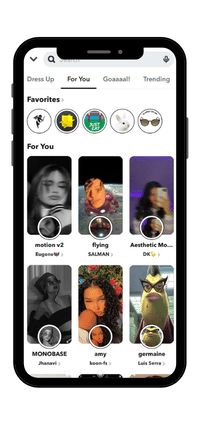
On the Snap Explore Tab
To find a specific lens or search by theme, you need to go to the Explore gallery. For this, go on your camera, click on the lens button (the smiley button) and click on the right bottom “Explore”. You will arrive in the Explore tab where all lenses are available. You can tap on the search section for a specific keyword or explore categories.
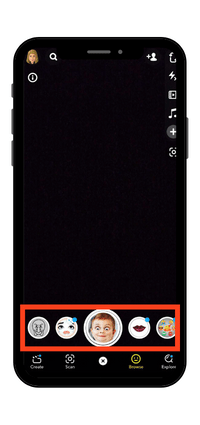
Before you record Snap stories
When you open your camera on Snap, you will find a smiley button on the right of the recording button. Click on it and lenses will appear. If you scroll to the right, you will find Lenses highlighted and sponsored by Snapchat. If you don’t find the filter that you want you can go to the Effect Gallery.
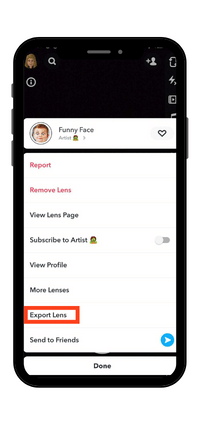
With an IG link
You can share a link to a filter with your friends. For that, when you try a lens, click on the information button on the left top of the screen en click on “Export Lens”. You can choose to copy the link or share it directly on another application. When you receive a link, you only need to click on it and try the filter.
When you see a story or snap
When a friend or a person that you follow shares a snap or stories with a filter, the name of the effect appears. This permits you to try directly the lens if you like it. For this, on a snap, you have a small icon of the filter on the left bottom, you only need to click on it and try it to reply to your friend.
Use a lens on the Snapchat application? How?
To use lenses on Snap required to go on the camera of the application. Choose the filter you want and check what type of camera you need (front or back camera). Some lenses activate them directly and others need to tap on the screen or make another action (smile, open the mouth…).
Then, to take a picture, click once on the record button, and if you want to take a video, stay on the press button to record a video. You can download the picture or the video and send it to your friends or on a story.
How much is Lens Snapchat? Price?
There are 4 ways to create your filter and all of these ways have different prices. In fact, the price depends on the interlocutor/actor you contact. We explain all the differences below.
Create a lens by yourself
FREE
The only way to create your lens without paying is to make it by yourself. For this, you need to create your assets (2D and 3D elements) and follow the guides given by Lens Studio.
With Customized Template (No skills needed)
From $ 19 to $ 99
With Lookaar you can easily have your filter. It is a platform where you can customize the templates of lenses. You don’t need any skills in augmented reality and coding. The only thing you must do is download your images or write your text on Lookaar.
With a Creator of lenses
From $ 400 to $ 5000
Lenslist offers a lot of creators on its website. Search the type of filter you want on the site and contact the creator of the filter to ask him to create your lens. The price depends on the creator’s skills and the complexity of the lens you want.
With an Instagram Filter Agency
From $ 2000 to $ 15 000
Filter Maker is the first agency of the creation of Instagram, Snapchat & TikTok Filters. You just have to contact them with a brief and Filter Maker will make everything. This type of service is reserved for brands and agencies.
How to create a Snapchat Lens by yourself?
You can create your Snapchat effect by yourself. In fact, the software dedicated to the creation of lenses is called “Lens Studio” and it can be downloaded on their website. This software looks like 3D software but is required to manipulate some interactions (visual scripting) to animate augmented reality. Before downloading and opening Lens Studio, you need to create your assets which are the elements (images, 3D objects, songs, videos) you want to integrate into your lens. For this, you must go through other software like Illustrator, Photoshop, or Canva.
How to create a Snapchat lens with Lens Studio by yourself.
Step 1:
Download & Install Lens Studio which is the Snapchat Augmented Reality Software.
Step 2:
Choose a Template from Lens Studio & Open it. All the templates help you to create easily your filter.
- 2D Animated TTS
- 2D Objects
- 3D Body
- 3D Hand Interactions
- 3D Hand Tracking
- 3D Hand VFX
- 3D Objects
- 3D Text
- Animated Objects
- ASL Fingerspelling
- Audio Analyzer
- Audio Classification
- Audio Output
- Baseball Cap
- Behavior
- Bitmoji
- Body Mesh
- Body Morph
- Body Segmentation
- Building Blocks
- Chain physics
- Change Beard
- Change Eyebrows
- Classification
- Code None
- Collect Coins
- Content Editor Tools
- Countdown
- Custom Component
- Cutout
- Disappearing Effect
- Distort
- Face Expression
- Face Image Picker
- Face in Picture
- Face in Video
If you don’t see the lens you want to create, you can also open a “New project”.
Step 3:
Create graphic elements for the filter.
- For 2D Elements you can use PNG/JPEG Files created in Photoshop, Canva, or Illustrator.
- For the 3D Elements, you can use FBX or OBJ files created on Blender or Cinema 4D.
Advice: Make sure that the sum of your assets does not exceed 8 Mo. It’s the maximum size of your Instagram Filter. So 3D elements need to be in Low Poly.
Step 4:
Create your Snapchat Lens in Lens Studio.
To animate your filter you have two choices:
- Use patches and connect them.
- Code your animation & interaction with React JS.
To learn how to use Lens Studio, you can use the official documentation.
Step 5:
Publish your Lens on Spark AR Hub.
Skills needed:
Graphic creation with Photoshop or Illustrator
3D Modeling on Blender or Cinema 4D
AR development with patches or React JS for complex animations/interactions.
Create a Snapchat Lens - Alternatives :
If you don’t want to learn how create a lens by yourself you can use the following alternatives :
Alternative 1:
If you are a company, you can contact an Augmented Agency, specializing in the creation of Snapchat Filters: Filter Maker.
Alternative 2:
You can contact an individual Lens creator on Lenslist.
Alternative 3:
You can generate automatically a popular personalized filter on our platform Lookaar.
Publish a Snapchat Lens? How?
You can’t publish a lens with the mobile application. You need to use Lens Studio to do it with your computer.
Tutorial to Publish a Snapchat Lens
Step 1: Open your lens project on Lens Studio
Step 2: Click on Publish Lens

If you didn't log in you before, make it now
Step 3: Fill in all the requested information
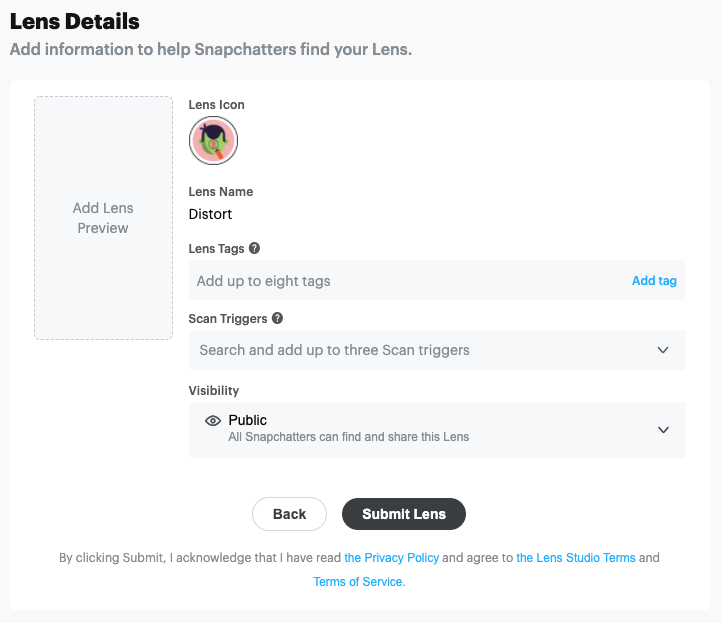
Lens name
It’s the name of the effect, it will be visible to users.
Advices
- The name needs to have a relation with your lens with keywords related to the effect.
- You can change the name after publishing the lens but there is another approval process.
Please note
- 18 characters maximum (including spaces). Use this tool to test the length of the effect’s name.
Tags
These help people find your effect when they are searching for a lens on the Explore Tab. On average, effects with keywords get more engagement.
Advices
- Use specific elements from your filter.
- Use keywords with 2 words to have a chance to appear first on the gallery.
Please note
- 8 keywords maximum
Thumbnail
The Thumbnail is an icon of your Snapchat Lens. The purpose of your Thumbnail is to help users understand the mechanisms of the Filter.
Advices
- The thumbnail is small, avoid putting too much detail in the image.
- Use bright colors to attract the user’s eye.
- Prefer images and icons instead of text (or just initials).
- Include an element that can help users to understand the mechanisms of the filter.
Please note
- Should be a format 320x320px.
Lens Preview:
the demo video is to help Snapchat Moderators to understand the mechanisms of your Filter, the video has to represent all features of your lens.
Advices
- Choose a sober and bright environment when recording the video.
- Show all the features of your filter in the demonstration.
Please note
- The demo video should be less than 15 seconds.
- Record your demo video directly from the test link on the app (not a screen record).
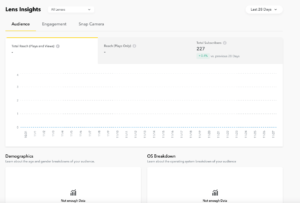
Snapchat Lens Insights? Audience?
When you publish a lens, Snapchat gives you the possibility to analyze insights about the lens.
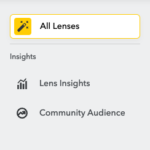
Where I can find Snapchat Lens Insights?
- Step 1: Go to Lenses Portal
- Step 2: Log in you
- Step 3: Click on “Lens Insights” on the left of the screen
- Step 5: Select the lens you want to see
You can see all the insights of your Instagram Filter. You can filter the insight by period ( 7 last days / 28 last days or lifetime). By type of experiences (video call, share experiences, all experiences) and by platform (Instagram, Facebook, or Messenger). If you want more information about Instagram filter Insights, you can find it on this link.
What are Engagement Insights?
Engagement Insights available on Lens Studio:
- Plays: The number of times your Lens(es) have been activated in the camera in Snapchat.
- Total Views: The sum of Lens views from direct snaps, story posts, and plays in Snapchat.
- Total Shares: The total number of times your Lens(es) have been shared in Snapchat.
- Total Favorites: The total number of times your Lens(es) have been favorited in Snapchat.
- Sessions per UU: The average number of sessions that a unique user has played with your Lens in Snapchat.
- Play time per session: The average length of time spent playing with the Lens per session in Snapchat.
- Play time per UU: The average length of time a unique user plays with the Lens in Snapchat.
- DAU / WAU: The proportion of weekly active users who engage with your Lens in a one-day window.
- DAU / MAU: The proportion of monthly active users who engage with your Lens in a one-day window.
What are Audience Insights?
Audience Insights available on Lens Studio:
Audience Insights are based on user information when they create an account on Snapchat.
- Demographics: Approximated age and gender breakdowns of your audience.
- Top Countries: Discover where your audience is located.
- Top Interests: Learn about the top interest categories of your audience.
FAQs
What is a Lens?
A lens is the integration of 2D or 3D elements thanks to augmented reality on the camera of the Snapchat Application. AR allows to make the environment or the user more dynamic.
How can I create a Snapchat Lens by myself?
To create your own Lens, you need to get Lens Studios which is the software specially developed for Snapchat. You will find all the steps by clicking here.
There is an alternative with Lookaar that help you to create your filter without developing on Lens Studio. You only need to choose the type of filter you want and customize it on the website.
Where can I find The lenses on Snapchat?
You can find filters in 5 different locations. You can find them on the camera of Snapchat, the “Explore Gallery”, on Snap, with a link to the lens, and on the account of the creator of the lenses. To have more details, click here.
What is the difference between filters and lenses?
A filter is like decoration you can add after taking a picture or video. A lens is the whole elements you can add before taking your photo or video.
How can I see if my lens is used?
To see if your lens is used, you need to go to Lenses Portal and login you. After that, you will see all your lenses and their insights. There are insights for the audience, and for the engagement.
How can I publish my Instagram filter?
To publish your lens, you need to go on the Lens Studio Software and open the project of your effect. Then click on “Publish Lens” and fill in all the elements that Snapchat needs to validate your lens. Click here to see all steps with details.
Are there restrictions for effect on Instagram?
All social media have restrictions on their utilisations. First of all, you must follow the Lens Studio Guidelines and Snapchat Policies.